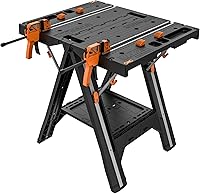
How to Build a Garage Workbench With Drawers
To build a garage workbench with drawers, set the overall size and bench height first, then build a rigid frame, add a thick top and a drawer box between the legs. Fit the drawers on slides, install handles and a stop, then brace and finish the bench before you load it.
On this page (8 sections)
- What size and height should your garage workbench be?
- How do you build a workbench frame that stays square?
- How do you attach a sturdy workbench top?
- How do you plan the drawer box?
- How do you fit drawer slides and handles?
- How do you brace the bench and keep it steady?
- How should you finish and organize the bench?
- What mistakes should you avoid when building a drawer workbench?
To build a garage workbench with drawers, set the size and height first, then build a rigid frame, add a thick top, and fit a drawer box between the legs. Slides, handles and a stop make the drawers usable, and bracing plus a finish keep the bench steady.
Plan the footprint and working height before you cut anything, then build the frame and top around those numbers so the drawers have a clear opening to slide into.
What size and height should your garage workbench be?
Start with the footprint and the working height, because every later cut depends on them. A common bench height is about 34 to 36 inches for standing work, and a depth of 24 to 30 inches keeps the top within reach without eating floor space.
Measure the wall you plan to use and leave room to walk past the bench. Mark the height where your elbows bend comfortably when you stand at the bench, then add the top thickness to the frame height so the finished surface lands there.
For a frame kit, the FLEXIMOUNTS legs stand 35.4 inches tall before lumber is added.
A bench up to 96 inches long and 48 inches wide fits the FLEXIMOUNTS kit's maximum dimensions. Pick a length that leaves the drawers a clear opening between the legs and keeps the top supported end to end.
Set the bench on adjustable feet or a base plate if your garage slab slopes, since a slope will make drawers bind if the frame is out of level.
How do you build a workbench frame that stays square?
Build the frame square and brace it before adding the top. A square frame is the difference between drawers that glide and drawers that rub, so check the diagonals and adjust before you tighten the last fasteners.
Cut the legs and rails to your plan, then join them with steel brackets rather than relying on screws into end grain. The Heavy Duty Workbench Bracket Kit gives you 8 steel 3-way corner brackets with pre-drilled holes and 64 screws for 2x4 lumber.
Its brackets measure about 4.7 x 4.1 x 4.1 inches.
Lay the frame parts flat on the floor and measure both diagonals before driving screws. When the two diagonal measurements match, the frame is square.
Add a rear rail or a diagonal brace to stop the bench from racking when you push a plane across the top.
If you prefer a steel frame, the FLEXIMOUNTS kit supplies pre-drilled legs, hardware covers and plates, screws and instructions. Lumber is not included, so you buy the rails and top separately.
How do you attach a sturdy workbench top?
Attach a top at least 3/4 inch thick and fasten it to the frame rails, not just the legs. A thicker top spreads load, resists sagging between supports and gives drawer slides and vises something solid to bite into.
Cut the top to the finished footprint with a small overhang at the front and sides. Plywood is the budget choice; a glued double layer or a solid wood top adds weight and stiffness.
Our guide to wood top workbenches covers the trade-offs if you plan to buy rather than cut.
Drill pilot holes so you don't split the wood, and use washers under the screw heads. Run fasteners through the rails into the underside of the top and keep them away from the drawer opening.
A top that overhangs the drawer box by an inch or two gives your hands a place to rest while you pull a drawer.
Check the top for flat with a straightedge before you load it, and shim or plane any low or high spots so the bench sits flat.
Should you buy a steel leg kit or build a wood frame?
Buy a steel leg kit when you want a fast, strong base without cutting joinery. The FLEXIMOUNTS kit carries up to 1,000 lb per shelf, and its steel frame resists the moisture swings in an unheated garage better than thin wood joints.
Build a wood frame when you want to shape the bench around an odd wall or reuse lumber you already have. Wood is easier to modify later, but it needs bracing and careful fastening to match the stiffness of a steel kit.
How do you plan the drawer box?
Plan the drawer box around the clear opening between the legs and the slide hardware. Measure the opening width and depth, then subtract the slides so the box glides without rubbing.
A typical drawer is built as a four-sided box with a base panel set in a groove or dado.
Decide how many drawers you need and what goes in each one. Shallow drawers suit hand tools, fasteners and small parts, while deeper drawers fit power tools and bulky items.
Keep the top drawer below the top surface so it doesn't hit the overhang.
Draw the drawer boxes to scale before cutting and label each part so the fronts and sides don't get mixed up. Build the boxes square, because a twisted drawer will bind no matter how good the slides are.
Check the slide length against the drawer depth. Slides come in set lengths, so pick the drawer depth to match a slide you can buy rather than cutting a box and hunting for hardware later.
How do you fit drawer slides and handles?
Fit the slides to the frame first, then to the drawer box. Mounting the cabinet member before the drawer member keeps the two halves aligned and saves you from measuring twice.
Clamp a straightedge or a spacer block to the frame so each slide sits at the same height on both sides, and drive the screws into the frame rails or a plywood panel, not into end grain. Then slide the drawer in and check the gap on each side before you fix the drawer member.
Drill the drawer front for the handle bolts and keep the handles clear of the top overhang so your knuckles don't catch. Add a stop block at the rear so a drawer can't pull all the way out and drop.
If one drawer rubs, loosen the slide screws and shim the slide rather than sanding the drawer, since a shim is easy to undo.
How do you brace the bench and keep it steady?
Brace the bench after the drawers are fitted and before you load it. A bench that racks will make drawers bind and put strain on the slides, so stiffness matters as much as strength.
Add a rear rail or a diagonal brace across the back legs. If the bench sits against a wall, fasten the top or the rear rail to the wall studs with a bracket so it can't tip.
Keep braces clear of the drawer travel so nothing catches.
Level the bench on the floor with shims or adjustable feet, then recheck the drawer gaps. If the bench will hold a vise or heavy tools, put those over the legs rather than in the middle of a span.
How should you finish and organize the bench?
Finish the top and add storage before you move tools onto the bench. Sand the top smooth, then apply a hard film finish or an oil finish.
A film finish handles spills better on a work surface, so let it cure fully before you set anything heavy on it.
Add wall storage above the bench for the tools you reach for most. The HMmagnets 12" Heavy-Duty Magnetic Tool Holders give you four 12-inch bars, 48 inches of holding space in total, in a set of 4.
Mount the bars where they won't block the drawers or the light. For more storage ideas, see our guide to a garage workbench with drawers and pegboard and match the wall system to the bench.
Pick up a workbench stool that puts you at the right height for detail work.
What mistakes should you avoid when building a drawer workbench?
The most common mistakes are an out-of-square frame, drawers cut before the slides are chosen and a bench that isn't braced. Each one shows up later as a drawer that sticks or a bench that wobbles.
Don't build the drawer boxes before you buy the slides, since slide length and mounting style set the drawer size. Don't skip the square check on the frame, because no amount of slide adjustment fixes a racked base.
Don't fasten the top only through the legs. Run screws through the rails so the top is supported along its length, and don't load the bench before the finish cures or the feet are leveled.
If you want a bench that folds away when the car needs the bay, a folding workbench is the better fit than a fixed drawer bench.
When you're ready to build a garage workbench with drawers, start with the size and height, build the frame square, and fit the slides before the drawer boxes. A steel kit speeds up the frame and a wood top gives the drawers something solid to hang from.
Then brace, finish and organize the bench so the drawers stay easy to open.
Frequently asked questions
How deep should workbench drawers be?
Drawer depth depends on the slide and the space between the legs. Measure the clear opening first, then subtract the slide hardware so the drawer box slides freely.
Shallow drawers suit hand tools and small parts; deeper drawers fit power tools.
Can I build a workbench with drawers without a table saw?
Yes. Many stores cut plywood and lumber to size, and pre-drilled bracket kits let you assemble a frame with basic tools.
A saw helps you trim the top and drawer parts, but a square, drill and clamps carry most of the build.
How much weight can a DIY workbench hold?
It depends on the frame and the fasteners. A steel leg kit rated at 1,000 lb per shelf carries a heavy top and tools, while a wood frame carries what its joints and bracing support.
Build the base square, brace it, and keep heavy loads over the legs and the top.